
In this tutorial we will learn how to use Node Webkit to built a desktop application to control a circuit with the Johnny Five library. We will make a simple program to turn a Led and a Motor on and off. We will also see why and how to recompile serialport.js and the needs of put some extra lines of code in our program to work properly with node-webkit. Over this tutorial we will see the errors that occurs and how to correct it.
Let’s getting started!
Note: I tested the version 0.8.6 of node-webkit in the Windows 7 (32bits) environment and it works fine. The versions 0.9.2 and 0.10.0 does not works for me at moment.
Node Webkit
From the project page:
“node-webkit is an app runtime based on Chromium and node.js. You can write native apps in HTML and JavaScript with node-webkit. It also lets you call Node.js modules directly from the DOM and enables a new way of writing native applications with all Web technologies.”
Once node-webkit makes all the magic to glue together node.js and webkit, you can use it to build an desktop application that use the johnny-five module to control a circuit througth an Arduino board.
Using a desktop application, you have some capabilities that a web application don’t have, due the restriction of sandbox, like create log files in the local user folder, discover the serial/usb ports and many more.
Furthermore, using a desktop application instead of scripts in command-line prompt, you get all GUI to explore and create applications that look-and-feel like native application. For example, in node-webkit you can create a native menu, copy to clipboard, show desktop notifications, interact with the shell and so on.
In this way, let’s create a simple application to explore this.
Our application
Below a snapshot of the structure of files and folders of the application that we will develop.
j5nw/
├── app/
|   ├── css/
|   │   ├── bootstrap.min.css
|   │   ├── font-awesome.min.css
|   │   └── style.css
|   ├── js/
|   │   ├── bootstrap.min.js
|   │   ├── jquery.min.js
|   │   └── main.js
|   ├── img/
|   |   ├── nodebot.png
|   |   └── background.png
|   ├── fonts/
|   |   ├── fontawesome-webfont.eot
|   |   └── ...
|   ├── node_modules/
|   |   └── johnny-five/
|   |       ├── node_modules/
|   |       |   ├── serialport/
|   |       |   |   └── ...
|   |       |   └── ...
|   |       └── ...
|   ├── favicon.ico
|   ├── index.html
|   └── package.json
├── buildTools/
|   ├── 7z/
|   │   ├── 7z.exe
|   │   └── ...
|   ├── ar/
|   │   ├── Resourcer.exe
|   │   └── ...
|   ├── nw/
|   |   ├── node-webkit-v0.8.6-win-ia32
|   |   |   ├── nw.exe
|   |   |   └── ...
├── release/
└── build.bat
We are using Bootstrap v3.2.0 and Font Awesome v4.1.0 to put a nice look in our application.
Let’s see next the main files and what each one do.
package.json
{
  "name": "j5nw",
  "main": "index.html",
  "version": "0.1.0",
  "description": "j5nw - Using Johnny-Five with Node-Webkit",
  "keywords": "johnny-five node-webkit arduino",
  "window": {
    "title": "j5nw",
    "icon": "favicon.ico",
    "width": 800,
    "height": 600,
    "position": "center",
    "resizable": true,
    "toolbar": false,
    "frame": false,
    "fullscreen": false
  }
}
The package.json file describes how our application will be and points to the main file index.html that will be run when the application start.
index.html
<!doctype html>
<html class="no-js">
<head>
<meta charset="utf-8">
<title>j5nw</title>
<meta name="viewport" content="width=device-width">
<link rel="shortcut icon" href="/favicon.ico">
<link rel="stylesheet" href="css/bootstrap.min.css">
<link rel="stylesheet" href="css/font-awesome.min.css">
<link rel="stylesheet" href="css/style.css">
</head>
<body>
<navigation id="menu">
<nav class="navbar navbar-default navbar-fixed-top" role="navigation">
<div id="dragBarTop">
<button type="button" class="close" aria-hidden="true" id="closeWindow">×</button>
</div>
<div class="container-fluid">
<div class="navbar-header">
<button type="button" class="navbar-toggle" data-toggle="collapse" data-target="#navegationBar">
<span class="sr-only">Change navegation</span>
<span class="icon-bar"></span>
<span class="icon-bar"></span>
<span class="icon-bar"></span>
</button>
<a class="navbar-brand" href="#">
<img src="/img/nodebot.png">
</a>
</div>
<div class="collapse navbar-collapse" id="navegationBar">
<ul class="nav navbar-nav">
<li id="linkLed" class="active">
<a href="#" >Led</a>
</li>
<li id="linkMotor">
<a href="#" >Motor</a>
</li>
<li class="dropdown">
<a href="#" class="dropdown-toggle" data-toggle="dropdown">Help <b class="caret"></b></a>
<ul class="dropdown-menu">
<li>
<a href="#"><i class="fa fa-book"></i> Docs</a>
</li>
<li>
<a href="#"><i class="fa fa-rocket"></i> Tour</a>
</li>
<li class="divider"></li>
<li>
<a href="#"><i class="fa fa-search"></i> Search</a>
</li>
<li class="divider"></li>
<li>
<a href="#"><i class="fa fa-info-circle"></i> About</a>
</li>
</ul>
</li>
</ul>
<!-- Serial Ports button -->
<div class="btn-group navbar-right portsButton">
<button type="button" class="btn btn-default" id="labelPort">Ports</button>
<button type="button" class="btn btn-default dropdown-toggle" data-toggle="dropdown">
<span class="caret"></span>
<span class="sr-only">Toggle Dropdown</span>
</button>
<ul class="dropdown-menu" role="menu" id="serialPorts">
<li><a href="#">port</a></li>
</ul>
</div>
</div>
</div>
</nav>
</navigation>
<div class="container" id="main">
<div class="row" id="containerLed">
<div class="col-lg-12">
<p class="text-center">
<i class="fa fa-lightbulb-o jumbotron-icon" id="led"></i>
<br/>
<button type="button" class="btn btn-lg" id="btnToggleLed">Turn On</button>
</p>
</div>
</div>
<div class="row" id="containerMotor" hidden>
<div class="col-lg-12">
<p class="text-center">
<i class="fa fa-cog jumbotron-icon" id="motor"></i>
<br/>
<button type="button" class="btn btn-lg" id="btnToggleMotor">Turn On</button>
</p>
</div>
</div>
</div>
<script src="js/jquery.min.js"></script>
<script src="js/bootstrap.min.js"></script>
<script src="js/main.js"></script>
</body>
</html>
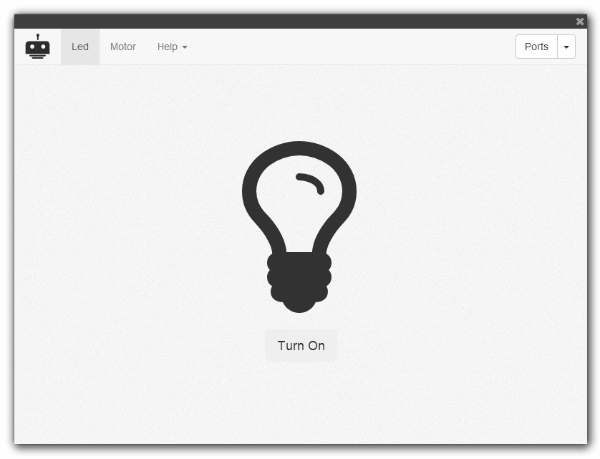
In the index.html file, we are defining how our application will be, creating a menubar with the options for the Led, Motor and a button to select the serial port that will used by our application to communicate with the Arduino board. Furthermore, we define the two areas that show the Led and the Motor icons, that will display the status of the components that are manipulated when the buttons are clicked to turn on or off.
At the end of file, we are including the main.js file that will do all the logic of our application.
main.js
// node-webkit
var gui = require("nw.gui");
var win = gui.Window.get();

// show devtools to debug
win.showDevTools();

// johnny-five
var five = require("johnny-five"),
  board,
  led,
  motor;

// serialport
var serialPort = require("johnny-five/node_modules/serialport");

// init
document.addEventListener("DOMContentLoaded", function() {
  // close window button
  $("#closeWindow").click(function() {
    win.close();
  });

  // menu links - to display Led or Motor area
  $("#linkLed").click(function() {
    $("#containerMotor").hide();
    $("#linkMotor").removeClass("active");
    $("#containerLed").show();
    $("#linkLed").addClass("active");
  });
  $("#linkMotor").click(function() {
    $("#containerLed").hide();
    $("#linkLed").removeClass("active");
    $("#containerMotor").show();
    $("#linkMotor").addClass("active");
  });

  // led button
  $("#btnToggleLed").click(function() {
    if (led.isOn) {
      led.off();
      $("#led").removeClass("led-on");
      $(this).removeClass("btn-primary").text("Turn On");
    } else {
      led.on();
      $("#led").addClass("led-on");
      $(this).addClass("btn-primary").text("Turn Off");
    }
  });

  // motor button
  $("#btnToggleMotor").click(function() {
    if (motor.isOn) {
      motor.stop();
      $("#motor").removeClass("fa-spin");
      $(this).removeClass("btn-primary").text("Turn On");
    } else {
      motor.start();
      $("#motor").addClass("fa-spin");
      $(this).addClass("btn-primary").text("Turn Off");
    }
  });

  // list all avaliable serial ports in the serialports button
  // user choose the port where Arduino board is connected
  var html = "";
  serialPort.list(function(err, ports) {

    ports.forEach(function(p) {
      var portName = p.comName.toString();
      html += "<li id='port" + portName + "'><a href='#'>" + portName + "</a></li>";
      // when user select the port
      $("#serialPorts").on("click", "#port" + portName, p, function(data) {

        $("#labelPort").removeClass("btn-primary").addClass("btn-default");
        $("#labelPort").html("<i class='fa fa-circle-o-notch fa-spin'></i>");

        // create the board connected to the port selected
        board = new five.Board({
          port: portName
        });

        // when board is ready
        board.on("ready", function() {
          // create Led component connected to the pin 13
          led = new five.Led({
            pin: 13
          });
          // create Motor component connected to the pin 5
          motor = new five.Motor({
            pin: 5
          });
          // and inject Led and Motor in the Repl of the board
          board.repl.inject({
            led: led,
            motor: motor
          });

          // show serial port name
          $("#labelPort").text(portName);
          $("#labelPort").removeClass("btn-default").addClass("btn-primary");
        });

        // when serial port error
        board.on("error", function(err) {
          // show error message
          $("#labelPort").removeClass("btn-primary btn-default").addClass("btn-danger");
          $("#labelPort").text("Error!");
          // remove error message and return to normal state
          setTimout(function() {
            $("#labelPort").removeClass("btn-danger").addClass("btn-default");
            $("#labelPort").text("Ports");
          }, 5000);
        });

      });

    });

    // show serial ports names
    $("#serialPorts").html(html);

  });
});
The main.js has many comments that describe itself.
From line 1-15 we are creating the references for the window, serialport and johnny-five. Also we are declaring the board, led and motor variables to be used.
Next, we will wait until the entire DOM content is load to start attach the handles for clicks in the links, buttons, etc.
Click in the #closeWindow button will close de application, following the node-webkit documentation.
Click in the menu links #linkLed and #linkMotor will switch between the led and motor container areas.
Click in the #btnToggleLed and #btnToggleMotor will check if is on and turn it on or off.
Next, we are using the serialport list function to list all availables serial ports and display it in the #serialPorts select button.
When the user select the serial port, we are using the johnny-five library to create a new board and attaching it to the selected port. When the board is opened we are also creating a led, attached to the pin 13 of the board, and a motor, attached to the pin 5 of the board, and we are injecting both in the Repl of the board. We are also displaying the name of the selected port in the select button.
At the end, we are listening for the error event of the board to display an appropriated message to the user.
Since all the code of our application is ready, let’s install the johnny-five module and its dependencies.
Installing Johnny-Five
Attention: If you don’t wanna know why we will need rebuild the node-serialport module later to works correctly with node-webkit, go to the “Installing Johnny-Five for Node-Webkit directly” section.
Go to the app folder and run:
npm install johnny-five
A node_modules folder is created in the app folder and the johnny-five library is installed. Also note that the serialport is created in the node_modules folder inside the johnny-five folder.
Behind the scenes, npm install will call node-pre-gyp install command, that will call node-gyp install command, to compile node-serialport module from the source and generate the correct version for the environment that you are running. In this case, for node.js environment running in a Windows 32bits. You can see it in a folder like this:
serialport\build\serialport\v1.4.2\Release\node-v11-win32-ia32\serialport.node
We will see later why this version does not serve for us.
Building our application
The build process that we will follow is an adaptation of the nodebob project. Is used the 7zip tool to compress the files and the Anolis resources tool, to define the icon for our application. The reason to use these tools is because they can be run in the command line and accept arguments, making ease to use from the build.bat file. These tools are inside the buildTools folder, as weel as the node-webkit files, in the nw folder.
Download these tools and place in the correct folders. You can download the old versions of node-webkit here.
Note: You can use other tools if you want, like WinRar or WinZip to compress the files and the Resource Hacker to set the icons.
Bellow the build file:
build.bat
@echo off

set CUR_DIR="%CD%"
set EXE_PATH=%CUR_DIR%\release\nw.exe
set ICO_PATH=%CUR_DIR%\app\favicon.ico
set NW_VERSION=0.8.6
set NWEXE_PATH=%CUR_DIR%\buildTools\nw\node-webkit-v%NW_VERSION%-win-ia32\nw.exe
set NWZIP_PATH=%CUR_DIR%\release\app.nw

SETLOCAL EnableDelayedExpansion
for /F "tokens=1,2 delims=#" %%a in ('"prompt #$H#$E# & echo on & for %%b in (1) do rem"') do (
  set "DEL=%%a"
)

call :ColorText 0C "nodebob v0.1 (modified)"
echo.
call :ColorText 0C "---"
echo.
echo.

if not exist release md release

echo.
call :ColorText 0a "Creating app package..."
cd buildTools\7z
7z a -r -tzip %NWZIP_PATH% ..\..\app\*
cd ..\..

echo.
call :ColorText 0a "Creating executable..."
echo.
copy /b /y %NWEXE_PATH% %EXE_PATH%
cd buildTools\ar
if exist %ICO_PATH% Resourcer -op:upd -src:%EXE_PATH% -type:14 -name:IDR_MAINFRAME -file:%ICO_PATH%
copy /b /y %EXE_PATH% + %NWZIP_PATH% %EXE_PATH%
cd ..\..

echo.
call :ColorText 0a "Copying files..."
echo.
rem if not exist %CUR_DIR%\release\ffmpegsumo.dll copy %CUR_DIR%\buildTools\nw\node-webkit-v%NW_VERSION%-win-ia32\ffmpegsumo.dll %CUR_DIR%\release\ffmpegsumo.dll
rem if not exist %CUR_DIR%\release\libEGL.dll copy %CUR_DIR%\buildTools\nw\node-webkit-v%NW_VERSION%-win-ia32\libEGL.dll %CUR_DIR%\release\libEGL.dll
rem if not exist %CUR_DIR%\release\libGLESv2.dll copy %CUR_DIR%\buildTools\nw\node-webkit-v%NW_VERSION%-win-ia32\libGLESv2.dll %CUR_DIR%\release\libGLESv2.dll
if not exist %CUR_DIR%\release\icudt.dll copy %CUR_DIR%\buildTools\nw\node-webkit-v%NW_VERSION%-win-ia32\icudt.dll %CUR_DIR%\release\icudt.dll
if not exist %CUR_DIR%\release\nw.pak copy %CUR_DIR%\buildTools\nw\node-webkit-v%NW_VERSION%-win-ia32\nw.pak %CUR_DIR%\release\nw.pak

echo.
call :ColorText 0a "Deleting temporary files..."
echo.
del %NWZIP_PATH%

echo.
call :ColorText 0a "Done!"
echo.
goto :eof


:ColorText
echo off
<nul set /p ".=%DEL%" > "%~2"
findstr /v /a:%1 /R "^$" "%~2" nul
del "%~2" > nul 2>&1
goto :eof
The build.bat file is very simple. Is defined some variables at the beginning to be used later, compressed the necessary files, set the icon for the application, created the release folder and copied the final files to this folder. It’s also deleted the temporary files created.
Notice that, at the beginning of the file, we are setting the node-webkit version that we will use:
set NW_VERSION=0.8.6
set NWEXE_PATH=%CUR_DIR%\buildTools\nw\node-webkit-v%NW_VERSION%-win-ia32\nw.exe
By this way, you can test different versions of node-webkit easily.
Note: We are not copying the
ffmpegsumo.dll,libEGL.dllandlibGLESv2.dllfiles, notice the ´rem´ caracteres at the beginning of the lines, because we are not using sound and video resources or using GPU acceleration in our application. See more details here.
Note: We are copying the entire
node_modulesfolder here. This is not necessary since many files are not necessary, like documentations, examples and test files. Try modify this to get only the necessary files.
Now, double click in the build.bat file to run it. At the end, our final application is ready to be run.
Go to the release folder and open the nw.exe file.
When we run it, the application is opened but the following error appears:

Frustrating, no?
Why this error?
This error occurs because the johnny-five dependency node-serialport is a “3rd party modules with C/C++ addons”.
From the project page:
“When such a module is installed for Node (with npm install command), npm uses its internal version of the node-gyp tool to build the addons (from their source code) for Node.js.
To build such a module for node-webkit, nw-gyp (a special fork of node-gyp) is necessary. You also have to run nw-gyp manually, because npm (being a Node’s tool) does not know anything about building for node-webkit and using nw-gyp.”
By this way, we need recompile it to work correctly with node-webkit, using the nw-gyp.
NW-GYP
Let’s install the nw-gyp:
npm install -g nw-gyp
You will also need to install:
- On Windows:
- [Python][windows-python] ([
v2.7.3][windows-python-v2.7.3] recommended,v3.x.xis not supported) - Windows XP/Vista/7:
- Microsoft Visual Studio C++ 2010 ([Express][msvc2010] version works well)
- For 64-bit builds of node and native modules you will also need the [Windows 7 64-bit SDK][win7sdk]
- If the install fails, try uninstalling any C++ 2010 x64&x86 Redistributable that you have installed first.
- If you get errors that the 64-bit compilers are not installed you may also need the [compiler update for the Windows SDK 7.1]
- Windows 7/8:
- Microsoft Visual Studio C++ 2012 for Windows Desktop ([Express][msvc2012] version works well)
- [Python][windows-python] ([
You can get the Python 2.7.8 here and the Microsoft Visual Studio Express 2012 for Windows Desktop here.
Now that we have the nw-gyp and its dependencies installed, let’s rebuild the node-serialport module.
Go to the node-serialport folder:
j5nw/
├── app/
|   ├── node_modules/
|   |   └── johnny-five/
|   |       ├── node_modules/
|   |       |   ├── serialport/
|   |       |   |   ├── binding.gyp
|   |       |   |   └── ...
You will see that the binding.gyp is here, so, we can run the nw-gyp command:
nw-gyp rebuild --target=0.8.6
But, if we run it, we will get an error like this:
...
gyp: Undefined variable module_name in binding.gyp
gyp ERR! configure error
...
This error occurs because the serialport is following the node-pre-gyp syntax to define the binding.gyp file (check this list).
From node-pre-gyp project page:
node-pre-gyp makes it easy to publish and install Node.js C++ addons from binaries
In this way, let’s install node-pre-gyp tool globally:
npm install -g node-pre-gyp
and run:
node-pre-gyp rebuild --runtime=node-webkit --target=0.8.6
At the end, when the build process is finished, you can see that the process was performed correctly
...
gyp info ok
node-pre-gyp info ok
...
and a new folder for node-webkit environment is created, matching the correct version for the target that you specified:
...
├── serialport/
|   ├── build/
|   |   ├── serialport/
|   |   |   └── v1.4.2/
|   |   |       └── Release/
|   |   |           └── node-webkit-v11-win32-ia32/
|   |   |               └── serialport.node
...
Build and run the application again
Now that we have the correct version of node-serialport module installed to run with node-webkit, let’s build our application again.
Double click at the build.bat file. When the build process finished, go to the release folder and open the application.
When we run it, the application looks like normal, but when we try select the serial port in the select button at the top right, an error occurs and the application stops working :(

Other error, really?
This error occurs because the repl.js makes use of the process.stdin, as you can see here, and node-webkit still not implement it.
So, to resolve this, we need write some little extra lines in our main.js file.
Writing the hook
At the beginning of our main.js file, write the follow code:
var Readable = require("stream").Readable;
var util = require("util");
util.inherits(MyStream, Readable);
function MyStream(opt) {
  Readable.call(this, opt);
}
MyStream.prototype._read = function() {};
// hook in our stream
process.__defineGetter__("stdin", function() {
  if (process.__stdin) return process.__stdin;
  process.__stdin = new MyStream();
  return process.__stdin;
});

...
Here, we are creating the MyStream “class” that inherits from a simple Readable stream and we are setting a _read function for it, that does nothing. Next, we are defining a stdin property for the process object, that will be of type MyStream.
Thus, we fill the gap that the node-webkit does not implement.
Building and running it, again!
Now that we’ve fixed the process.stdin error, let’s build our application again.
Double click at the build.bat file. When the build process finished, go to the release folder and open the application.
Finally our application works correctly and we can interact with it!
Make sure that the Arduino board is plugged and then select the correct serial port.
The video below shows the interactions between our application and a Led component that is attached to the Arduino board.

Devtoos and Repl
Since we define that our application is frameless, in the package.json file
{
  ...
  "window": {
    "frame": false,
  ...
}
we can comment/uncomment the line
//win.showDevTools();
in the main.js to open or close the DevTools window and interact with the Arduino board and the Led and Motor components in the devtools console.
For example, try turn on and off the Led, writing the following commands in the devtools console:
led.on();
led.off();
This is useful when you need test something quickly or log the outputs in the console to debug it.
Installing Johnny-Five for Node-Webkit directly
Previously in this tutorial, we saw that we need rebuild the node-serialport module to works correctly with node-webkit. In this way, if you like to install it “directly” without the needs of rebuild again the node-serialport, you can run the following command, when you install the johnny-five library.
npm install johnny-five --runtime=node-webkit --target=0.8.6
But, before run this command, make sure that you have installed the nw-gyp tool globally:
npm install -g nw-gyp
and also the node-pre-gyp tool globally:
npm install -g node-pre-gyp
Also, remember that you need to have installed the requirements to run the nw-gyp tool to recompile the node-serialport module from the source code, as discussed earlier (Python 2.7, Visual Studio 2012, etc)
When we run the command
npm install johnny-five --runtime=node-webkit --target=0.8.6
behind the scene, the npm install command will call the node-pre-gyp install, that will call the nw-gyp install, once we specified that the runtime is the node-webkit. It will try recompile from the source every native addon module. In this case, the node-serialport module.
Go ahead!
We have seen in this tutorial how use node-webkit to create a desktop application that uses johnny-five library to interact with an Arduino board and the components attached to it. We also see the errors that occurs over the way and how to correct it.
We use the Windows environment here, but you can taking advantages of node-webkit architecture and create cross platform application with all the power of web technologies and node.js.
You can also inclue back again the ffmpegsumo.dll, libEGL.dll and libGLESv2.dll files and create an application that interact with sounds and videos. You can also use libraries like Three.js to display a 3D objects, taking advantages of GPU acceleration, and interact with it when the user manipulated some physical components attached to the Arduino board.
So, go ahead and try create something more complex and share with us.
Source code
You can download the source code here.
Extras
There are a bunch of others “desktop packagers” like tecnologies that you can also try. Check this other tutorial that show how to use Atom-Shell with johnny-five. (soon)